In this article we will explain how we organize and setup our own queen rearing method, adding a few extra tips and tricks to keep the operation well organized. This blog post is probably directed at more advanced beekeepers running 20-50 hives wanting to expand, or any semi-commercial or commercial beekeeper.
One can raise queen bees in a bunch of different methods, such as walk away splits starting their emergency protocols, or saturation and triggering pre-swarming behaviors. One can use the push in hive tool trick on some 1-2 day old larva on existing brood comb, or go to the stage where one grafts young larva into separate cups called grafting, which we show below.
To very briefly touch the basics on the bee cycle, we are interested in grafting larva on day 4 of the worker bee cycle, meaning the egg has been in the cell for 3 days, and on the day the larva hatches is the day we intend to move / graft that larva into a special cell cup. In our case we utilize the NICOT queen rearing system. Well at least we use some part of it, as we keep things pretty traditional.
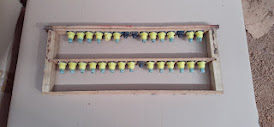
Basically we put 2x 14x grafts on 1 bar of a WSP frame and depending colony strength and saturation we place 1x or 2x frames into the cell starter colony.
If you observe very carefully on the above graft frame you may notice the green color within the grafts, this had been an experiment to better identify the amount of royal jelly being stored in the queen cups, without needing to open a few cells, thereby killing some queens in process to validate the feeding quality of the queens.
Basically we added a very saturated food dye into some sugar water, placed on the cell starter, which yielded blue / green royal jelly, which is quite easy to be see against the light and could help checking grafts. And no, the queen does not turn blue!
When looking at our graft frames, we generally have a color coding of our frames in general, such as:
White standard brood comb
Green Drone comb used in the brood chamber (can incur wax moth damage)
Pink/Red Drone comb, which never hold brood, located over excluder (no wax moth damage)
Blue/Red queen grafting frames
However on our Red/Blue graft frames we recently have added an extra piece, which is a strip of whiteboard.
usually people tend to write the dates of the day the graft bar has been inserted on to the frame. Assuming you run 10-20 cell builders, things can get a little interesting in terms of all the scribbles on the frames and trying to find space to scribble the new date on the frame. Hence we needed something which works a little better for us.
Mini whiteboards for your graft frames:

Please let us know if this information had been useful on your journey to your first set of bee hives!
Feel free to browse to our complimentary Youtube channel which goes hand in hand with this blog.
Happy beekeeping,
----------------------------------------------------------
Our content is for informational purposes only and do not form a professional relationship.
Please refer to the full disclaimer on Quickwings pty ltd’s website found here:
https://quickwings.com.au/policies-and-tcs/
----------------------------------------------------------


No comments:
Post a Comment