Sunday, April 30, 2023

How to get bees to draw out honey comb faster

 When we first started beekeeping we started with 1 hive, then expanded to 4, then to 7, to 20, up to 40, down to 30, up to 70, doubling to 140, and now running generally 250+. hives all year round.

One of the main things every beekeeper will struggle with initially is getting foundation drawn out, this in order to either expand the brood nest, and or help expanding NUCs or later down the track to create a honey harvest.


Many larger commercial beekeepers may have forgotten the initial struggles of starting up their apiary and the time and energy spent on drawing out honey comb. For instance, when placing a box of foundations on a colony over the excluder, the acceptance is fairly slow, as in comparison when you place a sticky / built comb box over the excluder the adoption is fairly fast.

For us it took quite a few years to build up foundation to drawn comb, and finally being able to bank some of drawn out sticky frames, readily to be used on the next honey flow.

Initially we had been using wooden frames with wax foundation, which we later replaced with plastic inserts due to the exponential growth as we could not keep up creating wax foundations over time.

We started dipping the plastic inserts as people tend to do it in bees wax, and probably coated them with the standard 30 grams worth of bees wax. We had pretty average results in them drawing them out. Unless you had been on a honey flow, not a lot happens, and even if you are on honey flow, they draw it out fairly average.

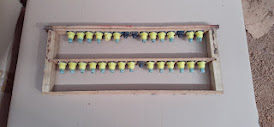
We then started experimenting with adding thicker layers of bees wax on the plastic foundations, and noticed a few things. When adding wopping 70-100 grams worth of bees wax to the frames, they seemed to draw them out on the slightest trickle of a honey flow. It seems like we give the bees all the supplies and they all needed to do is draw them out, "while being bored". The supplies give them a head start, however you will notice that the cells will only be drawn about half ways, enough however to get the bees to either start storing nectar in them, or have the queen bee pop an egg into those cells, and that's all that has to happen. As when the bees start utilizing those new cells, they will finish up the comb by their own demand and usage. Its however key to get the initial boost. If you really want to kick start things you can combine rolling on extra wax and giving them a little sugar water to help drawing them out. However keep in mind that you may end up contaminating your honey with this action. We nowadays simply roll our frames, and wait for the slightest honey flow to have them drawn out, which proved working nicely. My dad has become an absolute expert at this task!


Fresh wax works best! What we mean by that is, if you just recently (1-4 weeks) have rolled the wax coating on to your foundation frames, bees tend to work them even faster as if you give them foundation you had coated over 6-10 month ago with the same thickness. We are not quite sure why freshly rolled wax works even better, it may be the fresh smell of the new layer of wax, or the fact that it can be better worked when still freshly painted. Who knows...

The ambient / working temperature its important while working the frames. We typically try to do those tasks in the Australian winter time, as it helps with keeping layers of the cooling wax on the foundations. It seems to be the combination of the wax temperature, as well as the ambient temperature which makes the perfect coat. Also for the first few rolls of a a freshly dipped roller you will have to be gentle, and apply least amount of pressure on the foundation when rolling. Only when you get to the last drops of wax soaked within the roller you should apply pressure to the foundation to get the best coverage, slightly drawing out the comb, without just filling it comb with wax puddles.

Note, that in the picture our heated bees wax hardly has any bubbles, that's what the temperature should be like, to avoid it to be to runny and too hot. If your ambient temperature ins spring or summer is too hot, just use a fan to cool down the foundations as you paint them, as it helps with having the bees wax stick better to the frames while cooling down faster.

A safety warning:

Never walk away from the burning wax stove and or let the bees wax get too hot, as it will ignite if it reaches the bees wax flash point temperature or if it boils and starts spilling onto your burning stove the spillage may catch on fire. There is only one solution if the wax has gotten to hot, which is to take the heat source away. Hence, watch your melting bees wax at all times. Also never try to cool it down by poring water into the boiling pan, as you will just be engulfed in a fireball, its just like tossing water into a hot frying pan, a pretty stupid and dangerous idea.

Also we would probably recommend having a fire blanked handy as well as a fire extinguisher, just in case you talked to long on the phone and forgot about the stove. Being prepared and being able to do something about the mistake is better than to watch your house burn down. We do not take any responsibility for your actions!

Worker comb vs. Drone comb

As initially said, we utilize wooden frames with plastic inserts for our brood boxes, while also rolling on extra 70-100 grams worth of bees wax on to our drone comb frames. In our honey supers we are using drone comb supplied by ECROTEC, and its the Pink/Red 7.2mm drone comb on which the bees go nuts drawing them out when applied with the extra wax!! We use WSP frame standard, however the 7.2mm done comb plastic foundation does not exist yet in that format, hence we had to saw down the full depth sizes into WSP frame format size, just in case you wonder why the bottom looks cut off on those frames. There are a few benefits in using drone comb within the supers which we will explain on a dedicated blog entry about them.

Keep in mind this is quite considerable effort involved to roll all your boxes, however it can kick start your apiary, especially if your operation is of small to medium size and you intend to grow rapidly in a very short time frame. To give you an initial guidance about the effort involved in this tasks, we have estimated that we paint a 10 frame WSP box in about 6 minutes, plus handling the box another 1-2 minutes, yielding a round trip time of all tasks involved of somewhere around 8 minutes per box. This seems a large number of hours spend in the shed, but can save your bees taking for ever to get the box built, and rather have the box built in the first flow, and filled as well! Usually you either get the honey comb built, or filled, however using this technique you tend to get both in a single flow.


Have fun painting bees wax on to your frames!!

How to better organize your queen bee grafting frames - queen rearing operation

 In this article we will explain how we organize and setup our own queen rearing method, adding a few extra tips and tricks to keep the operation well organized. This blog post is probably directed at more advanced beekeepers running 20-50 hives wanting to expand, or any semi-commercial or commercial beekeeper.

One can raise queen bees in a bunch of different methods, such as walk away splits starting their emergency protocols, or saturation and triggering pre-swarming behaviors. One can use the push in hive tool trick on some 1-2 day old larva on existing brood comb, or go to the stage where one grafts young larva into separate cups called grafting, which we show below.

To very briefly touch the basics on the bee cycle, we are interested in grafting larva on day 4 of the worker bee cycle, meaning the egg has been in the cell for 3 days, and on the day the larva hatches is the day we intend to move / graft that larva into a special cell cup. In our case we utilize the NICOT queen rearing system. Well at least we use some part of it, as we keep things pretty traditional.

Basically we put 2x 14x grafts on 1 bar of a WSP frame and depending colony strength and saturation we place 1x or 2x frames into the cell starter colony.


If you observe very carefully on the above graft frame you may notice the green color within the grafts, this had been an experiment to better identify the amount of royal jelly being stored in the queen cups, without needing to open a few cells, thereby killing some queens in process to validate the feeding quality of the queens.

Basically we added a very saturated food dye into some sugar water, placed on the cell starter, which yielded blue / green royal jelly, which is quite easy to be see against the light and could help checking grafts. And no, the queen does not turn blue!

When looking at our graft frames, we generally have a color coding of our frames in general, such as:

White         standard brood comb
Green        Drone comb used in the brood chamber (can incur wax moth damage)
Pink/Red  Drone comb, which never hold brood, located over excluder (no wax moth damage)
Blue/Red   queen grafting frames

However on our Red/Blue graft frames we recently have added an extra piece, which is a strip of whiteboard.

usually people tend to write the dates of the day the graft bar has been inserted on to the frame. Assuming you run 10-20 cell builders, things can get a little interesting in terms of all the scribbles on the frames and trying to find space to scribble the new date on the frame. Hence we needed something which works a little better for us. 

Mini whiteboards for your graft frames:


Using whiteboard markers and the whiteboard strips stuck on those blue/red graft frames we can easily keep track of the graft dates, DNA source and also if we had bar merges etc, where you combine graft bars to free up unsuccessful graft bars, while being able to easily keep track of who is who, and which grafts hatches by which date. Additionally we usually stick an entire whiteboard on the top of the lid of the cell starters.
With Australian climate and UV exposure the paint of the whiteboard markers usually hold just long enough for the 2 weeks needed until they start to fade or being washed away, hence work nicely.

Construction explained:

Basically get the cheapest small whiteboard from your office supply shop in your area or online. In our case we went to OfficeWorks and picked up 20-30x on a special! :)


Measure your strips based on your frame bar size and start chopping the boards into strips. We only cut original white boards in half, as it gets a little scary once going closer to the bench saw blade. Also make sure you wear the appropriate PPE's while doing this task, as the whiteboard spray sharp bits and pieces all over.


Eventually you end up with the final product, ready to be used. 


Graft cup experiments:

If you again observe closely, looking at the frames, you may have noticed the different cell cups being used within the NICOT system. In one case we had used the standard plastic cups right of the shelf, in other instances we started coating the yellow and brown NICO cell cups and noticed way larger cells post coating them with extra bees wax. We came to a point that the NICO cell cups in a well fed cell starter colony actually could limit the size of the queen cells, and hence started making our own colored wax cups using food dye once again. This would allow the bees to alter the base size of the queen cells as needed. Additionally the change of the wax color helped us in the grafting activities, as it just makes the graft and cup more visible.

On Top:  painted / dipped NICO yellow/brown cups
Bottom:  colored wax cups


I'll try to write up a post on how we set up our queen cell starters and finishers in a different blog post, and I if I don't forget, will link it below.

Happy grafting!


How to paint your bee boxes on the cheap - Bunnings

 Did someone say cheap paint?

Assuming you need to paint a few hundred bee boxes every so often while either expanding or fixing up your existing bee boxes, then paint can become a fairly expensive item on the list.

However there may be a solution, to lowering your paint expenses, this as most hardware stores may have a paint section, and especially in spring we notice that in our local hardware store (Bunnings) they happen to have loads of miss-tinted paint usually sold at a fraction of its original price. Some paint may have already been opened and partially used. In other cases the bucket may be damaged etc. But you still have a good a mount of paint for a fairly good price.


Should you be using NANO-Paint for bee hives?

On another note, when speaking of paint we found the following paint after watching two beekeepers operating in Serbia using ECOTHERM paint. The paint is said to be able to generate 6cm worth of polystyrene like insulation with coat as little as 1 mm of the special paint. Within our operation we use polystyrene boxes hence we don't require this special paint, however in an operation utilizing wooden boxes I could imagine quite a few thermal benefits of using this product.

URL to the paint found here:   https://ecotherm.com/en/home/

Youtube link where Ecotherm is used 

One interesting thing we found was their experiment showing one side of a frying pan being covered with the paint while the other half is not. Then the guys put an egg into the pan, while the one side nicely fry's the egg, the other remains cold and uncooked.

This has absolutely nothing to do with beekeeping, just should illustrate the powers of this magic paint. As said we have not yet tested this paint and just have conducted some "Youtube research".

Happy painting!

How to easily decrystallize honey 30 kg buckets on small scale

Most Honey types crystallize over time and there is nothing bad about that, its just a natural thing to happen and there is nothing wrong with crystallized honey at all.

While some people seem to prefer crystallized honey it can become a bit unhandy for the beekeeper when it comes to bottling honey jars.

In our case we still store a lot of honey in 20 or 30 liter buckets, that's 8 gallons for people using imperial systems. We tend to first store it on those buckets prior either selling the buckets bulk or filling it into smaller jars for retail sales purposes. However filling of smaller jars can happen up to a few month later, hence the buckets can become crystallized by the time we intend to jar them.

Sous-Vide-Machine


When looking around for a simple solution to warm up the honey, to get it back into a viscous enough state to fill into jars we checked for something simple to use, low maintenance, zero effort requirement, and trying to be energy efficient.
That's when my brother Gordon was preparing some steaks using a Sous-Vide machine, when we found it to be also very handy to keep a large enough tub at perfect temperature to warm up our 30kg buckets full of honey. Same, same, but different.

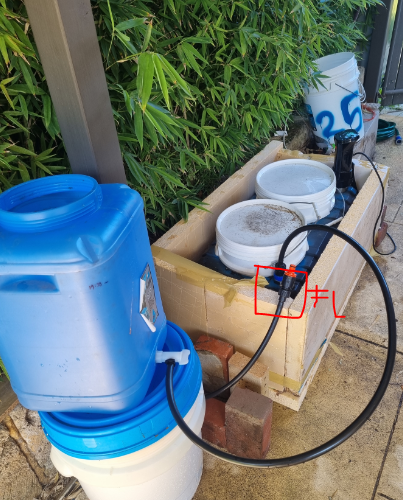
As it turns out we can place 2x 30kg tubs into the black tub, heating up the water to approx 38 degrees Celsius and letting the buckets sit there for around 24h. Once done we can insert the next 2 buckets while the water still remains warm and keeps the heat for another few rounds of buckets.


Depending on how well insulated this is being setup, I could imagine it being fairly economical in terms of energy consumption. You also may change the heat source from electricity to gas.

The fact that we can easily just pop in 2x new buckets while the water is already pre-heated makes it fairly efficient, also if the heat source switches off for some reason then the heat does not just instantly dissipate.

Below you can see the Sous Vide machine dialled in for 25 hours at 38 Celsius.

Recent updates to above have been:

Mosquito mesh to the sous-vide machine to avoid "stuff" from getting into it:


Long term operation:

Water evaporation causing the sous-vide machine to stop operating is a bit of an issue with the above system, however there is a easy fix, just add a large container of water on a stand next to it and insert a float valve into the water tub providing the heated water. This will keep the water level constantly at the point where the sous-vide machine can continue operating.
We added a bit of insulation and built a custom lid to retain the temperature and improve energy conservation. 

In 24 - 48 hours you are good to go to bottle approx 50-60 kg.


Stainless steel float valve found on eBay or Amazon:


Using the alternative wife's car de-crystallization method:


Your alternative may also be to use your partner's car to de-crystalize honey in the warmer month of the year, however I can assure you heaps of trouble....
Experience is always the hardest lesson to learn, hence make sure you clad out the area with baking paper or similar, or you'll end up with a bit of trouble as there's always that odd drip of honey and honey and hot cars is not much fun.


A recent car dash de-crystalization fail:

it only takes a short time until your honey jar gets all wobbly, so a word of caution when attempting to use the windshield method!! And this was during the Australian spring / September leading into October time frame.


Toolbox / solar heating:

This is same similar as the above, with exception of not using your wife's car for as a solar heater. The same style heater can be used to render bees wax also. In Perth Australia you would have to watch not to excessively heat the honey as it can become fairly hot and honey should not be exposed to over 38C to avoid cooking off the goodness within over extended period of time. Once found again, we will link the study about temperatures and duration and damage done of excessively heating honey too much here.


CONTHERM digital series oven

DingDong Fabian from Suncity honey showed us his funky oven, which seems to do the job quite nicely and in a very short amount of time. This seems like an easy "no fuss" solution which fits 2x buckets at any given time.


Happy honey bottling!


Our Story - how it all began - the bumps - and where we are going...

 well, that's a bit of a longer story...and there had been hiccups ...

Many many moons ago, at a time we still had lived in Switzerland, we had been experimenting with growing all sorts of crops in various types of soil, we also played around using hydroponics and Aquaponics and in some occasions we also tried growing crops without water and soil all together using water mist / fog based systems. The hole focus was always on growing crops and optimizing the growing media for maximum harvest, which ever we had intended to use. 


Beekeeping as such was a logical "accident" to happen later down the line, once we arrived in Australia, and had developed our backyard, and once continued of where we had stopped in Switzerland by building raised beds, veggie patches and planting 20+ fruit trees around our house in Perth's suburbs and continued the efforts of amending our pile of sand and turning it into a healthy soil around the house.

When in 2016 we had gotten our first backyard bee hive due to optimizing the next logical step in the sequence, pollination of the crops! While my brother Gordon, previously had gained previous experience by having worked for Kim Fewster and the Fewster Farm in a commercial beekeeping entity a few years earlier, this while I had zero experience with the bees at the time and below is how we first started, our first backyard hive:


On a sunny Sunday while having showed off the bees and pointing out the queen to my older brother Donald and the kids, I must of dropped the queen and or squashed her during the excitement, as probably quite a few new and excited beekeepers would do!
Exactly 14 days later, again on Sunday I would inspect the bees again, and I would even have more excitement, as I found queen cells for the very first time. I remember how I phoned my brother Gordon, asking him what to do, as one of the virgin queens was just about to push the capping off or queen cell and emerge the very moment I had the frame in my hands. Time was not on my side, and I quickly gathered a spare box and improvised a bottom and hive lid. This was probably the start, of what grew bigger and bigger over the next few years following. 

Out of our first hive we ended up with 3 splits, this while our backyard pollination efforts started to pay off nicely around the house with having a garden full of fruit and vegetables ranging from Avocados, Bananes to loads and loads of pumpkins.


After about a felt ton of pumpkins and all family members and friends starting to stop accepting any further pumpkins we knew we are on track with the soil and bee experiments, at least we knew how to grow "stuff" also in Australia in comparison to some rather icy growing attempts we had tried prior in Switzerland shown below. However not all of our crops always had been bumper crops...


One or two years into it in Western Australia and the bee-fever got us, and out of a few backyard hives, grew a few more and more, and with it the requirement for more hive sites.


Continuing our expansion, came the need to purchase more queens. However, out of our first 15 introduced queens, we probably had 4x queens actually making it, this by doing all sorts of beginner mistakes we could have done and our missing knowledge around the surrounding floral sources and flowering patterns would cause us high casualty rates in lost hives and the first big encounter of wax moth's destruction capabilities.


As we had been had been increasing our queen numbers, so had the boxes, frames, tops and bottoms had to increase too, and there comes a time where your hobby starts to go out of control. Boxes, boxes and more boxes... We had put in quite some time construct our own insulate our wooden boxes with a custom setup.


We expanded faster as we could continue to build our own wooden hives with custom insulation fitted to them, we had to move on to Paradise Polystyrene bee boxes to keep up with the bee expansion rates.


At the time we operated based out of our own homes and garages and pretty much any start-up, we once again had to move on and scale up and get a bigger shed and started operating out of Gingin Western Australia on a large bush block.


As the story goes on, the large shed once thought to be big enough for the project, has been outgrown and we needed some extra storage space and started arranging our headquarter.


Meanwhile we have had a few very close calls in 2020 and 2021 in terms of bush fires right in front of our doorstep and it had been a scary and catastrophic bush fire season for many families in WA.


And as time goes on, our trail and error continues...


Its one of those stories, probably told by every emerging beekeeping enterprise which is going through its expansion, initially having started with a 6x4 foot trailer and a handful of hives, and soon needed to upgrade soon to a 7x4, when a few month later we are using a 7m flat top trailer, and we will probably will soon be upgrading to the next level soon. (written 30.4.2021)


More and more customers are coming into appreciation of our quality NUCs.


In August 2021 we have placed our first "trial load" of 30 hives onto Canola, including the pallet with the 4 monitoring hives, and now can remotely observe their daily 2kg weight gain.


And then came 2021, a year in which what initially started as BE WORTH IT pty ltd came to a separation and Colin had removed himself from BE WORTH IT, and left his brother Gordon to drive the ship for the next few years due to differences in direction and operation.


In 2023 Gordon decided to discontinue the beekeeping operations and to concentrate his efforts in his own designs and packaging / packing rather than to pursue keeping bees, as it seemed too hard for him to manage.

QuickWings pty ltd was formed and created on the 20.4.2023 and will be taking over the beekeeping operation as of 30.6.2023 again. So we are back on track again after this slight hiccup. 


Off for e a new start...


We will keep adding to this post as time goes on...

Make sure you check in every so often!