Thursday, September 14, 2023

Hive lifter tools and solutions - transporting hives the easy way

Hive lifting, moving and relocation solutions:


This Blog post will probably be a "living document" as we discover the different types lifters and products we will update this page. Over time this will be a compendium of methods to pick from.


Shifting bees at night and red flood lights:

One thing to note first is that bees are being shifted in the dark as all bees are home by then.
the other thing to note is, bees do not easily see red light hence it makes it perfect to illuminate the working area with read light as shown above:


Read our blog post around illumination here:  Shifting bees the easy way using red light


So, lets get back to the topic...


Manual:

- Not recommended due to manual handling and issues with weight and slips and trips.

Either 1 or 2 persons carrying the hive by the box, or by the straps. Usually the lids slip, or bottom boards move and the bees crawl out and you are in direct contact with the bees streaming out, and stinging the living XXXXXX out of you. This is how we started, and its not a good way, 2 guys and a ute, but most people will probably start right there.


Trolleys:


Using a trolley like this in combination with a flatbed trailer using ramps is probably a better idea than lifting them manually of the trailer. Ensure the trolley has large wheels that do not dig themselves into soft underground. Also ensure that your ramps are not too steep or to slippery when dragging the hives up or down ramps. Keep the hives strapped while relocating, or you will "bee" in pain!

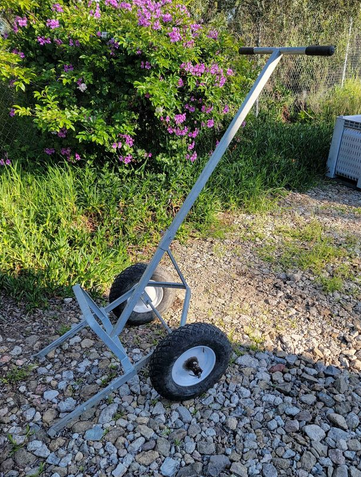


Home made hive dolly found on Facebook Marketplace:


Kaptar Lift:

Manual or Electrically powered:

We had purchased the manual kaptar lift, as there had been chit-chat about charges only lasting for a certain amount of shifting and also stories about the electrical malfunctioning during rainy nights, in our case we don't have much time to mess around with equipment hence the decision to be manual as it has a set speed, and low / consistent failure rate if at all and can be planned / calculated with.

In recent shifts we noticed that the combination of a regular trolley as above is working quite efficient in a 2 trailer setup. As 1 person is bringing the hives with the trolley above and the second person using the kaptar lift, "forks them" on to the flat bed if not using the ramps depending loading angles etc. It seemed to work quite efficiently that way.


For jobs up to 20-50 hives this tool is working fine, and handy on the smaller ones too as shown below:


AWD Kaptar lift - electrical:


Same version as the manual, with exception that you have powered wheels and the lifting is done by press of a button.


We had temporarily experimented with red light strips on the Kaptar lift to aid with the shifting at night. I think we picked them up at JayCar, however that experiment only lasted 1x shift until the cables ripped out the LED strip. Also having said that the light emitted from that particualar strip was not very bright. We used a power bank with the USB strip, which we are sure could be built to perfection, as we noticed its rather dark, right at the spot where one wants to drop off the hive, and one usually is standing in the light of the vehicle based red light flood lights from the car. The lifter red light has still got room for improvement!


Peter Debicki's tail gate lifting solution / Kaptar lift action:

Found on a Facebook beekeeping group:

This tailgate lifter is made by Healy group, and allows for a simple 1 person operation of ute sized loads. I imagine this could also be mounted to trailers potentially.


B2 Hive lifter from BeeBreedingCentre.com:

I stumbled accross this lifter the other day by accident and found it quite interesting.
Some people are using the Kaptar lifts similar to the B2 shown here, as in lifting of the supers and using the lifters to help under or over super with heavy boxes, taking the weight of your back.


What I do like is the "paddles" shown on this lifter, locking the boxes in place when picking up, but allowing them to slip down into position. I kind of like the engineering in this solution.
We've been told that the "paddles" are built from butt hinges, so feel free to be mechanically creative and build them yourself, as we have not found a commercial entity selling them as such.


HiveHelper:

Discovered on a Facebook Group:

http://www.hivehelper.com.au/


Brick Trolley:

Just recently by coincidence I noticed Brick Trolley's which may be beneficial when moving heavy honey supers assuming you have a little crew going, this trolley might come in handy! 


Trailers:

Trailers and beekeeping just seem to have a tendency to grow, until the maximum is reached. It was no different in our story, first started with a 6x4, 8x4, 6m flat top trailer, MR truck with posi truck.


Kennards:

all those lifters go very handy with rented trailers such as the 6m flat top trailer from Kennards as shown below.
You may decide to wheel your hives on to the tray using some form of ramp or simply just fork lift them on to the tray and move them manually into position once on the tray.
However, using this trailer please ensure you start loading from the front of the trailer to ensure the weight at the front, pressing the axle and weight on your rear tyres of your car, or you will face a "swinging trailer" due to unsafe weight distribution on the trailer.


MoveYourself Trailers 24h:

Recently we have discovered Move Yourself trailer hires, especially the 10x6 trailers with loads up to 1499kg. The cool thing is that the return is 24h, as there are distributed 24h fuel stations which offer pickup and return anytime of the day/night. Meaning you would probably be able to get away with an 8 hour lease rather than a 24h one, as you can still return the trailer 02:00 in the morning once you are done with the shifting for instance, rather climbing out of bed early next day to return the trailer. Also the trailer comes with a ramp which drops down 1.2m at the back. It may be a bit steep to go up and down with a trolley or Kaptar lift, especially in the night and with due setting in and making everything slippery. Hence we would suggest taking an extra ramp to lower the ramp angle to make things easier and less dangerous. A foldable wheel-chair ramp may just do the trick. Ramp Champ – Australia's Largest Range of Ramps | RampChamp.com.au might be a good stop to have a look.


When comparing the long flat top trailer from Kennards with the MoveYourself trailer, the GVM ratio is way better on the MoveYourself one. Also when dragging back full honey supers you may be able to return more honey using the 10x6 trailer.

Honey load calculations:

For example the Paradise System 10 Frame WSP supers containing drone comb at 7.2mm cell size, are around 26-29 kg, frames and boxes together.

1499 / 29kg =  ~ 51 Supers which could be returned using this super.

The Paradise honey boxes usually fully built frames weigh somewhere around 5-6kg themselves, so out of this you would probably end up with 22kg of honey per box 

So 50x boxes in total would yield in 1100kg of honey using the 10x6 trailer and a lot of lifting!

Peter's trailer:

being able to drop down the rails on a trailer is a nice addition and makes load safety fairly simple and fast. You can also see the tailgate lifter on this picture rarely consuming any extra space.


Manual vehicle / trailer based lifters:

Healygroup.com.au seem to have all sorts of handy heavy duty lifting equipment which may be of interest. The one shown on this picture however limit you to lift up or drop down very close to the proximity of your vehicle or trailer. Unless you combine this method with a trolly to then move the hives further away from your vehicle, which could combine both worlds and make it fairly efficient with a two-person team.


Maxilift or Kevrek

Buy a maxilift or Kevrek second hand, and combine the operation with dropping them on the floor and running them into position with the trolleys. Doing this in a two man band can be a very fast operation one person dropping them on the floor, the other rolling them into position.


EasyLoaders and trailers:

This picture is courtesy of Troy Watson kindly sharing his setup constructed by EzyLoader.
The loader is powered by the vehicle 3x 12V batteries. 
GVM is 3.5 tonne Troy gets 36 doubles on it and can load another 36 triples on top.
Trailer is 5.5 metres long by 2.1 wide. 

Its quite a cool setup for the semi-commercial beekeeper getting a bit sick of Kaptar lifts and or other manual means.


EazyLoader300

Make sure you visit https://www.youtube.com/@aCanadianBeekeepersBlog as I follow Ian along on his journey and he is happy and heavy adopter of the EazyLoaders which seem to work well in his operation. Assisting his team with transporting/deploying hives as well as tasks such as under suppering without ever carrying the weight manually.
However, they come with a bit of a price tag.


Dingo's

There are all sorts of rental places where you can pick up a Dingo for fairly cheap pricing for the day.

I can recommend https://thehireguyswangara.com.au/products/dingo-hire/  when you are located in Perth WA. 

Once you get a introductionary mechanized tool, you will encounter that you will need either a plant trailer, or will operate some more serious truck / MR or even bigger sized vehicle. Now you need heavy duty ramps, and the required GVM on trucks and trailers to make the trip efficient while ensuring you are not overloading your truck in weight or having uneven weight distribution, as well has having the right heavy-duty straps.
Also sites which may have been working for you using smaller tools may no longer be suitable for the slightly bigger equipment you bring along, in terms of mobility and or noise / an nuisance issues to neighbors.


BobCat / Possi Tracks:


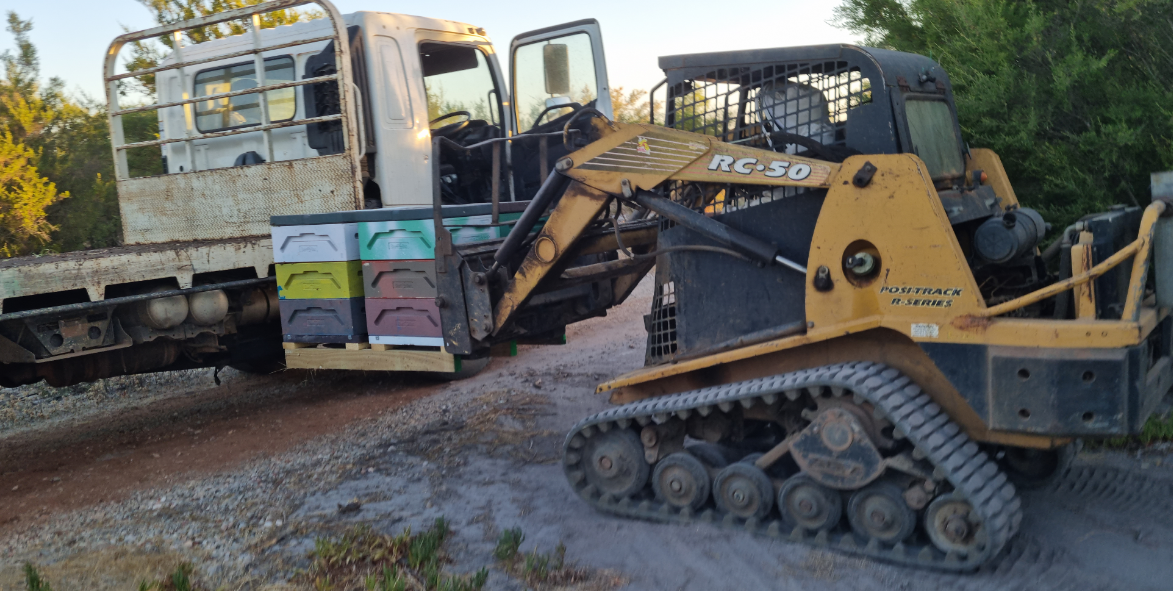
And at some stage you end up with MR sized trucks with heavy duty plant trailers and some form of loader, in this case its a posi-track and having customer 4 way pallets setup.
However, once again, your choice of site now has shifted potentially again, as not all sites will allow such heavy equipment in and out, while at others the tracked vehicle is nearly mandatory to avoid bogging and or climbing steep angles with the hives.
And to be truthfully honest, the posi is just a cool tool to toy around with!


Where ever you are in your beekeeping journey, let us know how you shift your hives so we can add it to the above list!

Happy beekeeping,

The QuickWings Team

----------------------------------------------------------
Our content is for informational purposes only and do not form a professional relationship. 
Please refer to the full disclaimer on Quickwings pty ltd’s website found here: 
https://quickwings.com.au/policies-and-tcs/
----------------------------------------------------------


Polystyrene / Poly Hives and smokers - fail - and how to avoid burning holes in them

Poly Hives have been heavily adopted as well as many other plastic type hives such as Nuplas hives amongst beekeepers and there is a growing shift towards insulated bee hives solutions.

However, we still use the good old smoker while working away, and rest assured, in how we tend to put it down and often rest the smoker on the next best and closest hive to free up our hands.

You can easily do this on wooden hives with wooden or tin sheet lids, but its less forgiving when doing so on plastic or polystyrene ones.

Even said you have a routine and act quickly to go from hive to hive to try to work prior the heat burning in a hole of the next poly hive, there is always this unforeseen situation where your attention wonders, slips for just a few seconds longer than intended and second by second your smoker digs deeper and deeper into the poly hive lid without you noticing.

Most of us i'm sure of running poly hives have been there, or at least will be close of getting to that point faster than they want. See below for yourself how fast such things happen...
It happened to us multiple times already...


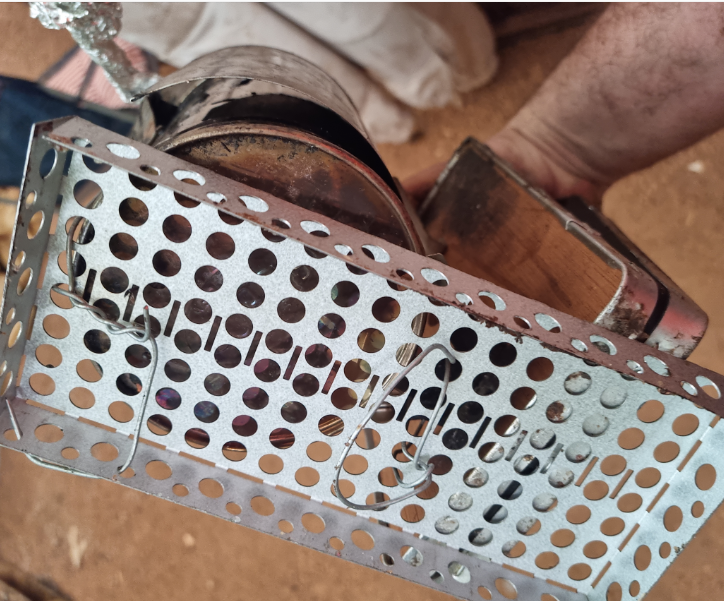
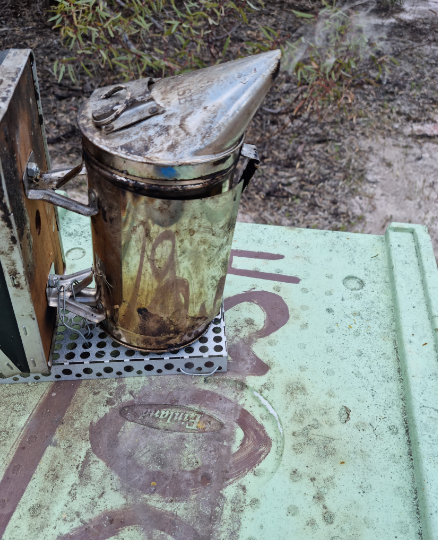
Out of urgency to fix this fast we looked for solutions and played around with a rather primitive fix and added a piece of gutter guard from bunnings out of the garden section underneath the smoker in an attempt to figure out a way that would do the trick.


And to our surprise the heat is evenly dissipated over the perforated tin piece under the smoker without causing any burns or it is digging into the polystyrene.

The basic solution of just using wire to strap it underneath the smoker is not a pretty looking setup but does seem to do the trick and came out of time pressures to make it fit with what was available, engineering on the go.

Problem..... Solution....   
Problem..... Solution....  Problem..... Solution....


Now it is possible to leave the smoker on top of plastic or poly hives regardless how hot the smoker puffs along...


Also have we discovered the powers of household aluminum foil to quickly put the smoker out and be ready for relocation / transport, as it seems to last longest for that purpose and is readily available.


If those kinds of tips help you on your yourney to be a better beekeeper, make sure to let us know on our facebook page.

Happy beekeeping,

The QuickWings Team

----------------------------------------------------------
Our content is for informational purposes only and do not form a professional relationship. 
Please refer to the full disclaimer on Quickwings pty ltd’s website found here: 
https://quickwings.com.au/policies-and-tcs/
----------------------------------------------------------

Friday, May 26, 2023

Australian Bee-Vacuum / Bee Hoover made from Bunnings Vacuum - How To

Taking a hoover you buy from bunnings and turning it into your Bee-Vacuum, here is how:


We bought this hoover here from bunnings to have a play and see how we could turn it into a bee vac as easy as possible. The following steps will show you our design and how we got there:


FROM THIS:


TO THIS:


Not that this looks flash, but it seems to work


1. Remove the bottom plastic piece of the hoover and mark the middle of the vacuum, to prepare to drill the whole into it.


2: Close / cover the whole drilled with metallic mosquito wire and glue it as flat as you can.
Use temporary aid such as gaffa tape to secure it in place, and liquid nails from bunnings does a great job and drying fairly fast.


3.Close up all ports of the vacuum's outside. This is not to prevent bees escaping the bee vacuum, rather to avoid anything crawling into the vacuum while you are working around the bees or not having vacuum in use for a while in a shed full of bees. This step is not necessarily mandatory, but i thought it probably be wise to close it off. 


4.Get yourself a 30 litre bucket and drill a whole centered in the middle. Use the aluminum hoover bucket to guide you to get the proper alignment.

Same deal here again, drill the whole and stick a bit of metal flyscreen or mosquito netting underneath the lid. use liquid nails or similar and keep in place with sticky tape!
Sticky tape solutions! love them!!


5. Next, drill a whole for the suction hose into the bucket and improve the structural integrity of the hose.Take what ever piece fits the bill and glue it as a support of the hose conector.


6.Now drill a few 2-3mm holes into the bucket in a small area, which is used to optimize suction and air flow. In case you experience your vacuum is sucking to hard, killing the bees expose more holes, if you need to increase suction, cover those holes with a sticky tape / cloth tape


7.Softening the landing area. This part ensures bees don't hit the hard bucket edge. This is still a bit experimental, so come back for updates to see if we modified this bit at a later date. Basically, get yourself a sponge, and either leave it in its plastic rapping or enclose the sponge in plastic, to avoid having bees get stuck on the surface. you literally just want them to have a softer landing in the bucket, that's all.


8. Now putting it all together, close the bucket, place the aluminium hoover bucket on top.
Ensure you close off the hoover suction hole with the custom made plug and strap the hoover down onto the bucket with the elastic hooks. Probably get new ones, as my old ones on those pictures are about to disintegrate into dust.


10. Please ensure that during operation you keep the suction hole blocked with the white custom made plug to allow the suction to happen via the bucket and being able to hose up the bees into the bucket. Open and close the little drilled holes by opening up or closing / covering the suction holes in the plastic bucket with the tape until the optimal airflow has been achieved.


11. Once you are done sucking up all the bees, switch off the hoover and quickly relocate the plug from the hoover down to the bucket to avoid any escape-bees!

Then seal and transport the bucket and relocate them to your desired location.


Happy Swarm season!


Tuesday, May 2, 2023

The joys of statistics: DPIRD Beekeeping statistics of Western Australia. Our head count, and in which suburb most beekeepers are operating.

Lets have a look at the exiting topic of statistics and registered beekeepers in Western Australia.

Lets start with the total registrations of beekeepers since 2005. The line remains fairly flat until into 2012 where there had been quite a significant growth and increase in yearly registrations. Keep in mind what you are looking at are the yearly additions to the already registered beekeepers.


When we look at the totals building up the graph looks a bit like this:


At the time of this writing (20.4.2023), there had been a total of 4877 registered beekeepers according to DPIRD in April 2023 in Perth Western Australia.


When we have a look at within which suburbs those beekeepers are based we can see the following:


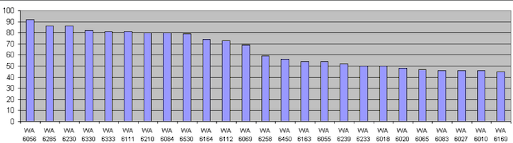
When you further examine the top 25 zip codes out of above list then the following crystalizes below, indicating which zip code in WA holds most beekeepers.


ZIP CODE Registrations WA-6056 92 Midland area WA-6285 86 Margaret River Area WA-6230 86 Bunbury Area WA-6330 82 Albany Area WA-6333 81 Denmark Area WA-6111 81 Kelmscott, Roleystone, Camillo, Perth WA-6210 80 Mandurah Area WA-6084 80 Bullsbrook, Lower Chittering, Chittering, Avon Valley WA-6530 79 Geralton WA-6164 74 Success, Cockburn Central, Jandakot WA-6112 73 Armadale, Harrisdale WA-6069 69 Ellenbrook, Aveley, The Vines WA-6258 59 Manjimup WA-6450 56 Esperance WA-6163 54 Bibra Lake, Spearwood, Hamilton Hill WA-6055 54 Guildford WA-6239 52 Donnybrook WA-6233 50 Australind WA-6018 50 Karrinyup WA-6020 48 Sorrento WA-6065 47 Wanneroo WA-6083 46 Gidgegannup WA-6027 46 Joondalup WA-6010 46 Claremont


Now lets focus on when as in which month of the year beekeepers tend to sign up and register themselfs with DPIRD as there seems to be a recuring wave pattern visible:


And as it turns out, April seems to be the low point of all new beekeeper registrations followed by August when things start to kick off again for the year and then peaking into spring and summer followed by a drop of going into March again.

We will probably update this blog entry over the coming years every so often to reflect the updates since last posting, as its kind of interesting on what is happening in this space.


Happy number crunching and analysing!

Monday, May 1, 2023

How to easily keep track of your bees using Hive Brick Codes

Bee hive records using bricks - hive brick code cheat sheet

There are multiple reasons for you to keep track of what is happening within your bee hives, some just simply like to track things and have measurable information to later look up and compare.

Others may need to keep records for regulatory reasons such as when operating as a commercial beekeeper and shifting bees from site to site. As always in beekeeping there are 100 different ways to tackle on how you keep your records on your bees. Some people have a sensational memory, however most people probably probably struggle to recall what they had seen a few weeks or month ago, especially when you are dealing with a few hundred hives and different sites. Others may use Apps using their phones and tablets, but we find it that a sticky situation!


We utilize 2 different documentation systems. One system is applied to production sized colonies, while NUCs or Nucleus colonies / starter bee hives have additional more granular information recorded, and are a bit more fragile to deal with and need more details recorded.

For our more stationary production hives we had adopted using bricks to document and record the bee hive status.


Our life cycle start with an empty or dead out colony. The next step is the unknown status, this happens if we have not found clear indication of a laying queen or another expected result, and can be used to mark a hive that needs attention within a weeks time. This can happen after the mating setting had been set, and after 14 days we still do not see eggs, however the bees had started creating the circle and show indications of a virgin/mated queen present. In some cases its necessary to insert a queen cell, or we simply come across self raised queen cells which have their own tag / code. Assuming all goes well the queen turns into a laying queen and all is happy and well. Especially on approaching autumn and winter you may want to document how well fed your girls honey stores and or if they need supplementary beefing up and are low on feed.

In other cases you may experience the odd laying worker or drone layer. In some cases, especially when raising NUCs / starter hives you also may need to mark hives which need queen, to allow you to track and count how many queens to bring to the site. Other hive records / brick codes could include that the hive needs another super box on top during the next coming inspection round for example.

At present we have not adopted painting the individual brick sides with different colors, such as used when marking the age of the queen. The tricky thing with our code is we only have 4 sides of the brick and the queen age documentation would require a fifth side, of which we are obviously lacking a side, or would have to decide not to raise queen in a certain year, not a very practical idea. You could however mark other informations using colors such as:


- Age of your queen
- Queen genetic line
- Hive used as breeder queen
- Hive used as graft starter hive
- Hive used as graft finisher colony
- Hive strength in regards on how many frames are used.
- Hive is unfriendly / aggressive in temper (do your fellow friends a favor and let them know)
- Hive needs a feed
- How much honey the hive produced
- MORE TO COME

Its really up to your own imagination to come up with what you need to have documented. 

In our case we use the bricks locally for decentralized hive records, while once done with the work, we use pen and paper to record the hive numbers and brick codes using site specific templates to gain centralized information about the apiary.

What can end up happening is, that the information about your operational status and hive strength ends up in your crews minds who have attended those particular sites. Assuming you have multiple crew members working at different sites, no one ends up having a full picture of what actually is happening within your beekeeping organization, unless you keep the centralized copies of the local brick status. The bricks allows for fast assessments of how much work is required onsite, and can help with resource planning.

It only takes a few minutes to walk past your hives at the end of the day and update your templates. Assuming you can come up with a marking system which can be easily scanned and automatically updates your spreadsheet / database then you could even further automate your apiary records.

As said there is multiple ways to skin a banana. Some people prefer notepads they keep with them at all times, others prefer their phone and tablet Apps to record their hive information, we however found phones and tablets a sticky situation in the field and have stayed away from them. Also, if the battery is out, your out, and if you happen to have left your charger at home, then it can involve a fair drive to go and pick it up in down under Australia.